ore-publication.md
@@ -18,7 +18,7 @@ Now, modify your buildscript to apply the Ore plugin. The [sponge-plugin-templat
    ```kotlin
    plugins {
      // [... existing  ...]
-     id("org.spongepowered.gradle.ore") version "2.1.0"
+     id("org.spongepowered.gradle.ore") version "2.1.1"
      // [... existing ...]
    }
    ```
ore-publication.md
@@ -31,10 +31,10 @@ Now, modify your buildscript to apply the Ore plugin. The [sponge-plugin-templat
    }
    ```

-To put everything all together, you'll need to pass your API key to Gradle. SpongeGradle will read this API key from the `oreToken` Gradle property, or if that is unset `$ORE_TOKEN` environment variable by default. To set this for all Gradle builds, add the following line to your `~/.gradle/gradle.properties`:
+To put everything all together, you'll need to pass your API key to Gradle. SpongeGradle will read this API key from the `org.spongepowered.ore.apiToken` Gradle property, or if that is unset `$ORE_TOKEN` environment variable by default. To set this for all Gradle builds, add the following line to your `~/.gradle/gradle.properties`:

 ```properties
-oreToken=<the token created earlier in this tutorial>
+org.spongepowered.ore.apiToken=<the token created earlier in this tutorial>
 ```

 You can test authentication by running the `./gradlew orePermissions` command. If successful, this task will perform a basic query to the Ore API.
ore-publication.md
@@ -0,0 +1,46 @@
+With the latest release of SpongeGradle, it is now easy to perform automated publishing of Sponge plugins!
+
+## Set up
+
+First, create an API key that allows uploading versions:
+
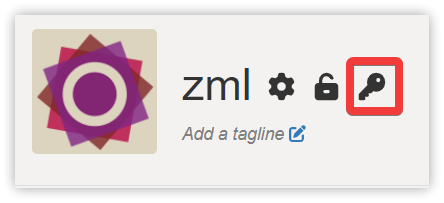
+1. Navigate to the API key screen from your profile on Ore
+ 
+2. Create a new API key with at least the `create_version` permission
+ 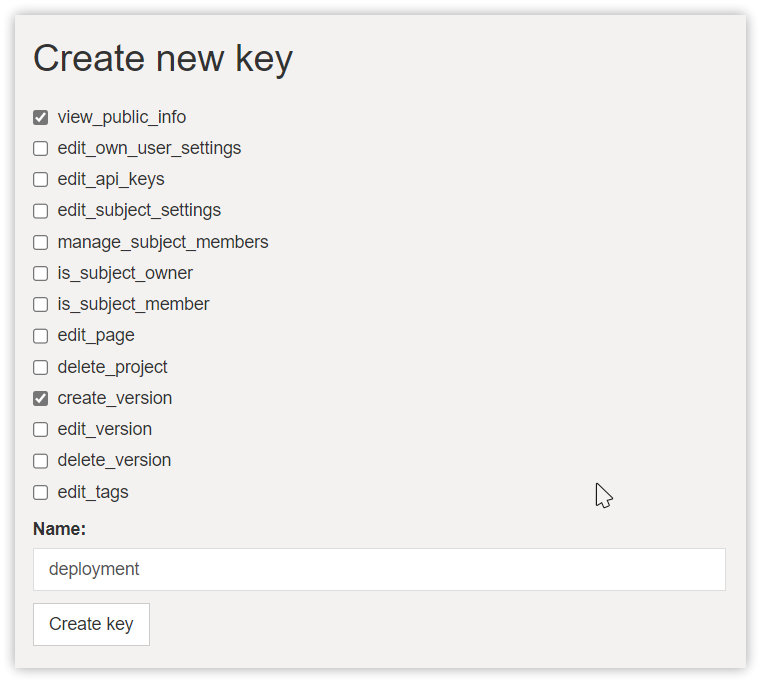
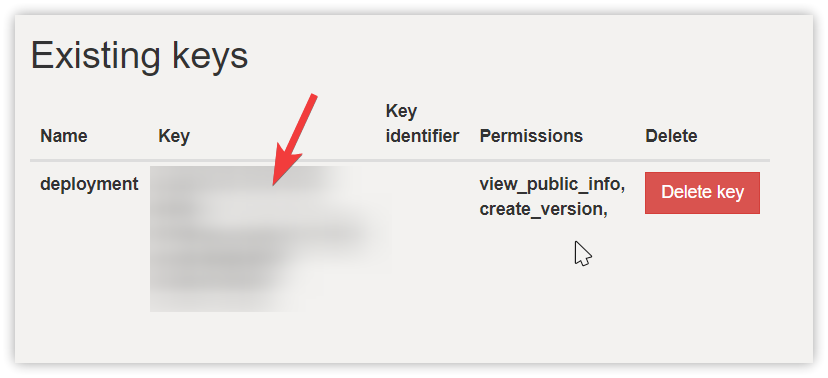
+3. Click "Create key", and copy the created key
+ 
+
+
+Now, modify your buildscript to apply the Ore plugin. The [sponge-plugin-template](https://github.com/SpongePowered/sponge-plugin-template) example contains this setup, or alternatively:
+
+1. Apply the plugin. At the top of your `build.gradle[.kts]`, add the plugin declaration:
+ ```kotlin
+ plugins {
+ // [... existing ...]
+ id("org.spongepowered.gradle.ore") version "2.1.0"
+ // [... existing ...]
+ }
+ ```
+2. Optionally, add a block to the buildscript reading from a changelog:
+ ```kotlin
+ oreDeployment.defaultDeployment {
+ if (project.hasProperty("changelog")) {
+ versionBody.set(file(project.property("changelog")!!).readText(Charsets.UTF_8))
+ }
+ }
+ ```
+
+To put everything all together, you'll need to pass your API key to Gradle. SpongeGradle will read this API key from the `oreToken` Gradle property, or if that is unset `$ORE_TOKEN` environment variable by default. To set this for all Gradle builds, add the following line to your `~/.gradle/gradle.properties`:
+
+```properties
+oreToken=<the token created earlier in this tutorial>
+```
+
+You can test authentication by running the `./gradlew orePermissions` command. If successful, this task will perform a basic query to the Ore API.
+
+## Publish
+
+Now, when you are ready to publish a release, simply run `./gradlew publishToOre` to publish your plugin.
+
+Additional logic can be added to upload changelogs, or choose different channels for beta/RC versions -- we hope you'll share any interesting solutions on the forums!
\ No newline at end of file